
Wednesday- June 9
Frequency separation consists of separating into two layers. On the one hand, the texture and on the other the color of a photograph. The objective is to be able to manipulate them without affecting each other. In short, that is what it is all about, in the next article I will talk about it in detail.
This technique is used today by many photographers and graphic designers. To a large extent because it facilitates the work of cleaning the skin of a portrait. It is about creating two layers grouped in a group and that their result is the same as the original layer.
This means that we can apply different and independent treatments to each area that do not interfere with each other directly. You have to have a lot of patience when applying this technique because it takes a lot of time and, above all, the photography must be of high quality to get a great result in my case I apply it with a photograph that I take in format RAW which is a development format that allows us to have more information about shadows and highlights when developing a photograph.

Let’s assume that you already have the photograph that you are going to edit, you simply have to duplicate the layer 2 times which we will occupy as follows: The top one will be texture, the second color, and the last one the original layer.
We activate the layer that we call Color, we deactivate the vision of the Texture layer, and we go to Filter after finally blurring Gaussian blur. This filter will blur the entire image. We will raise the Radius until we only see the shapes without any details.
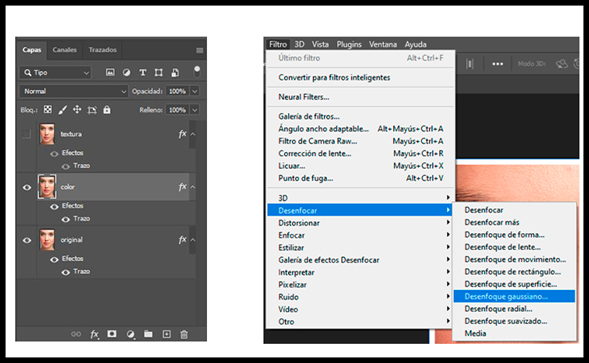
Now we are going to activate the texture layer to only keep the details. We go to image then we look for the options to apply image in fusion, we subtract the layer that we are using the layer that we call color in scale we put 2 and in displacement 128 and then we give ok.
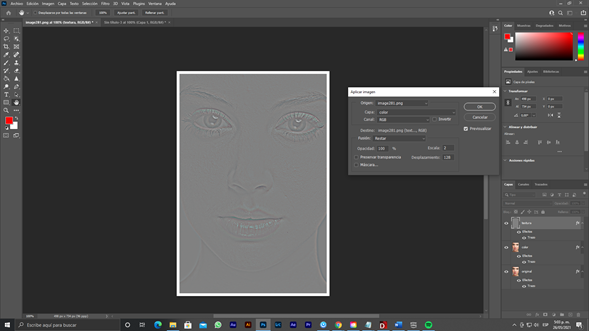
The next thing would be to work with the layer blending method that works with the grays, which in this case would be linear light.
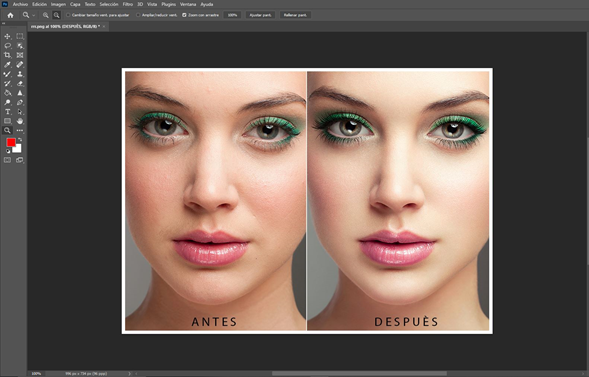
With this, we managed to separate the layers and as a result, we isolated the color and texture.
The next step will be to remove the imperfections of the skin by selecting the correcting pixel, we can select the one that best suits what we want to do, the next thing we will do is select the layer called skin and we are passing the pixel in the parts that have imperfections such as pimples, blemishes, wrinkles or hairs.
This type of technique is widely used today; it is used to achieve perfect skin in a photograph. The steps may vary depending on the creativity of each graphic artist, but this is the way I do it.

Manuel Maldonado – Photo and Video